Unity has revolutionized the world of game development, offering powerful tools and a user-friendly interface that empowers creators to build stunning 3D games. Whether you’re a seasoned developer or a beginner, this comprehensive guide will walk you through the process of creating 3D games with Unity. From designing captivating environments to implementing engaging gameplay mechanics, this guide will equip you with the knowledge and skills to bring your game ideas to life.
Creating a 3D Unity game can be an exciting and rewarding experience, but it can also seem overwhelming for beginners. In this guide, we will walk you through the essential steps and provide you with valuable tips to help you embark on your journey of making a 3D Unity game. So, let’s dive in!
Setting Up Unity
Before you begin developing your 3D game, you need to set up Unity on your computer. Start by downloading and installing the latest version of Unity from the official website. Once installed, create a new Unity project and set the appropriate settings such as project name, location, and template.
Designing the Game Concept
Every successful game begins with a well-thought-out and engaging concept. The design of your game concept sets the stage for the entire development process. This step will serve as the foundation for your development process.
- Brainstorming and Ideation
Start by immersing yourself in the world of games. Play different games, analyze their mechanics, and identify what makes them enjoyable. Draw inspiration from various sources such as books, movies, art, and real-life experiences. Let your imagination run wild and generate multiple ideas for your game.
- Defining the Genre and Art Style
Consider the genre that best suits your game idea. Is it an action-packed shooter, a puzzle-solving adventure, a strategy-based simulation, or something entirely unique? Define the genre based on the core experience you want to offer players. Additionally, consider the art style that complements your game concept, whether it’s realistic, cartoonish, retro, or any other distinctive style.
- Gameplay Mechanics
Define the core gameplay mechanics that will make your game engaging and enjoyable. Will it involve exploration, puzzle-solving, combat, resource management, or a combination of various mechanics? Determine how players will interact with the game world and the challenges they will face. Experiment with different mechanics to find a unique and compelling gameplay experience.
- Overall Theme and Story
Craft a captivating theme and storyline that immerse players in your game world. Develop a narrative that complements the gameplay and creates a sense of purpose for the player’s actions. Consider the setting, characters, and conflicts that will drive the story forward. A well-crafted story can enhance player engagement and create an emotional connection with the game.
- Objectives and Challenges
Define clear objectives for players to achieve within your game. Whether it’s completing missions, solving puzzles, or reaching specific milestones, objectives provide players with a sense of progression and accomplishment. Additionally, design challenges and obstacles that test the player’s skills and offer opportunities for growth and learning.
- Target Audience
Identify your target audience based on the nature of your game concept. Consider factors such as age group, interests, gaming preferences, and skill level. Understanding your target audience will help you tailor the game experience to their expectations and create a more enjoyable and engaging product.
- Iteration and Feedback
Share your game concept with others, such as friends, fellow developers, or potential players, and gather feedback. Iterate your concept based on the feedback received, refining and improving it to make it more compelling and unique. Be open to constructive criticism and be willing to make necessary adjustments to enhance the overall experience.
Creating the Game Environment
The game environment is where your players will immerse themselves. Start by designing the 3D assets, such as characters, objects, and scenery, using 3D modeling software like Blender or Maya. Import these assets into Unity and construct your game world by placing and arranging them within the scene. Pay attention to scale, lighting, and textures to create a visually appealing environment.
Creating the game environment in Unity involves several steps. Here’s a guide on how to do it:
- Designing Assets: Begin by designing the 3D assets for your game environment using 3D modeling software like Blender or Maya. Create characters, objects, and scenery that match your game’s theme and style;
- Importing Assets: Import the assets into your Unity project. Unity supports various file formats, such as FBX, OBJ, and DAE. Organize your assets into appropriate folders for easy access;
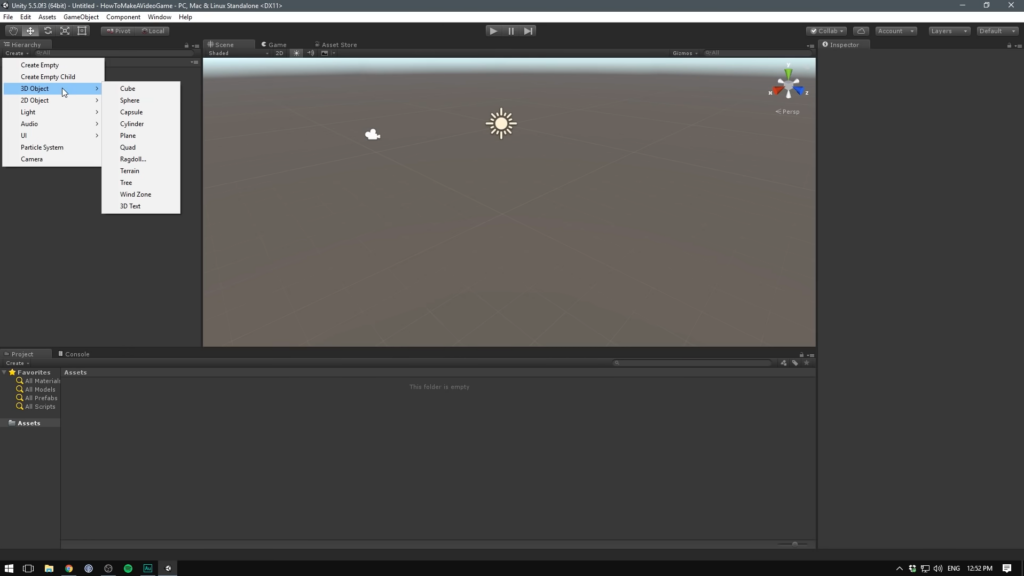
- Creating a Scene: In Unity’s Scene view, create a new scene or open an existing one. This is where you’ll construct your game environment. You can create multiple scenes to represent different levels or areas within your game;
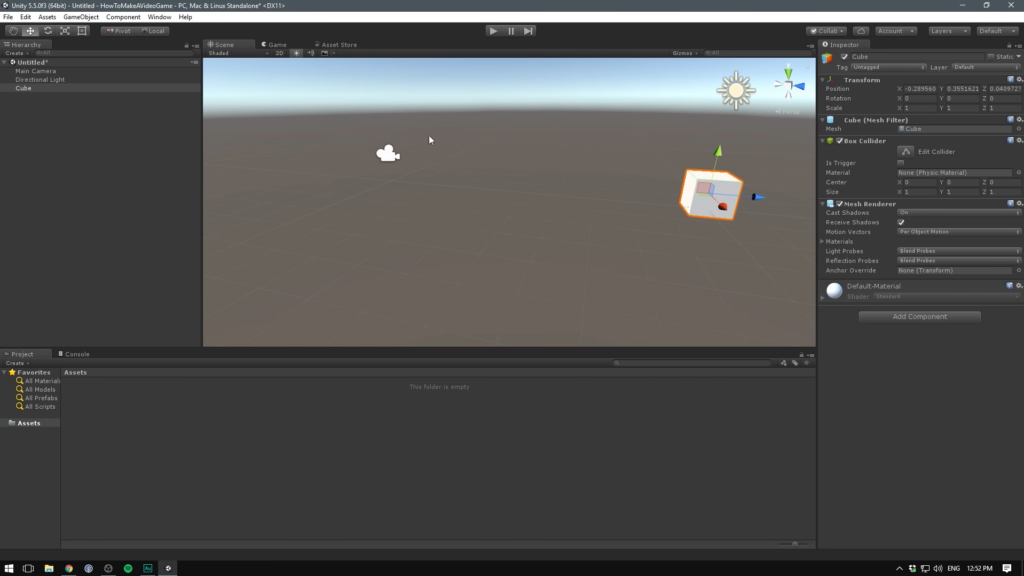
- Placing Objects: Drag and drop the imported assets into the scene to place them within the environment. Use Unity’s Transform tools to position, rotate, and scale objects as needed;
- Terrain Creation: If your game requires terrain, use Unity’s Terrain system to create realistic landscapes. Customize the terrain’s height, texture, and foliage to match your game’s setting;
- Lighting: Set up lighting in your scene to create the desired atmosphere. Unity offers a range of lighting options, including directional, point, and spotlights. Experiment with different lighting settings to achieve the desired look;
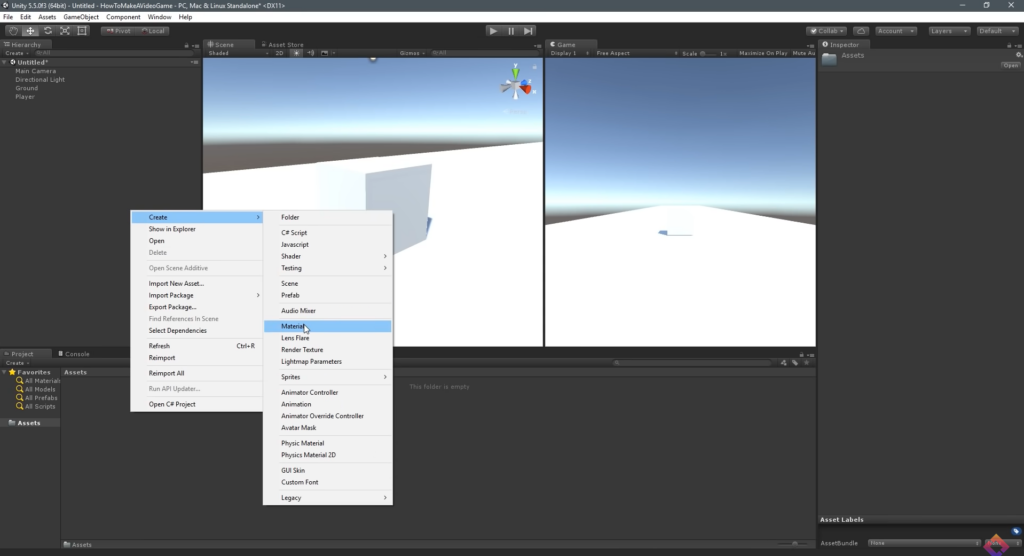
- Applying Materials and Textures: Apply materials and textures to your objects to give them realistic appearances. Unity’s Material system allows you to assign shaders, colors, textures, and other visual properties to your objects;
- Particle Effects: To add visual flair and dynamic elements to your game environment, consider using Unity’s Particle System. This powerful tool enables you to create effects like fire, smoke, water splashes, and more;
- Audio Integration: Enhance the immersion of your game environment by adding background music, sound effects, and ambient sounds. Use Unity’s Audio Source component to attach audio clips to specific objects or trigger them based on events;
- Testing and Iteration: Continuously playtest your game environment to ensure it provides a seamless and enjoyable experience. Make adjustments as necessary, refining the placement of objects, lighting, and effects until you achieve the desired outcome.
Implementing Gameplay Mechanics
This step involves scripting the functionality of your game. Unity uses C# as its primary programming language. Start by creating scripts for player movement, interaction with objects, and any other gameplay mechanics. Use Unity’s built-in components and APIs to handle physics, collisions, and animations. Continuously test and iterate your mechanics to ensure they are fun and engaging.
Adding Audio and Visual Effects
Enhance the immersion of your game by incorporating audio and visual effects. Add background music, sound effects, and voiceovers to create an immersive auditory experience. Utilize Unity’s particle system to generate eye-catching visual effects such as explosions, sparks, and weather effects. Polish these effects to match the theme and atmosphere of your game.
Adding audio and visual effects to your game in Unity can greatly enhance the overall experience.
How to incorporate audio and visual effects:
Audio Effects
- Importing Audio: Prepare or acquire audio files in formats supported by Unity (such as WAV or MP3). Import them into your Unity project by dragging and dropping them into the project folder;
- Creating an Audio Source: In the Scene view, select the object (e.g., character, environment) to which you want to attach the audio. Add an Audio Source component to that object by clicking on “Add Component” in the Inspector window and searching for “Audio Source”;
- Configuring Audio Source: Customize the Audio Source settings in the Inspector. Adjust properties like the audio clip (the imported audio file), volume, pitch, spatial blend (for 3D audio), and loop (to repeat the audio);
- Triggering Audio: You can trigger audio playback based on specific events or conditions using scripts. For example, you can play sound effects when a character jumps or when an action is performed. Use the AudioSource.Play() method in your scripts to start playing the audio.
Visual Effects
- Particle System: Unity’s Particle System allows you to create various visual effects like explosions, fire, smoke, and more. To add a Particle System, select an object in the Scene view, go to “Add Component” in the Inspector, and search for “Particle System”;
- Configuring Particle System: Customize the Particle System settings to achieve the desired visual effect. Adjust parameters like emission rate, shape, color, size, velocity, and lifetime. Unity provides a wide range of options to create visually stunning effects;
- Scripted Effects: For more complex visual effects, you can use scripts to control and manipulate objects in your game. By modifying object properties (position, scale, rotation) over time, you can create dynamic effects like animations or visual transformations;
- Shaders and Post-processing: Unity’s shader system allows you to create advanced visual effects by manipulating the rendering process. You can write custom shaders or utilize pre-built shaders to achieve specific visual styles. Additionally, Unity’s post-processing stack provides a collection of effects like bloom, depth of field, and color grading to enhance the overall visuals;
- Scripting Animation: Use Unity’s animation system to create animated visual effects. You can animate properties of objects, such as scale, rotation, or color changes, over time. This enables you to create dynamic and interactive visual effects within your game.
User Interface and Menus
Design intuitive and visually appealing user interfaces (UI) and menus to guide players through your game. Create UI elements for displaying health, score, and other essential information. Implement menus for starting a new game, adjusting settings, and accessing in-game achievements. Ensure that the UI is responsive and optimized for different devices and resolutions.
Testing and Debugging
Regular testing is crucial to identify and fix issues within your game. Perform playtesting to evaluate gameplay mechanics, balance difficulty, and identify any bugs or glitches. Utilize Unity’s debugging tools to inspect variables, breakpoints, and error logs. Make adjustments based on feedback and keep refining your game until it delivers a smooth and enjoyable experience.
Optimization and Performance
Optimize your game’s performance to ensure smooth gameplay across different devices. Optimize graphics by reducing the polygon count, utilizing LOD (Level of Detail), and implementing occlusion culling techniques. Compress textures, batch draw calls, and implement object pooling to improve rendering performance. Profile your game to identify bottlenecks and make necessary optimizations.
Publishing Your Game
Congratulations on completing your 3D Unity game! Now it’s time to share your creation with the world. Choose the appropriate platforms (PC, mobile, console) and follow the guidelines for each platform to package and export your game. Create compelling screenshots, videos, and promotional material to attract potential players. Consider releasing your game on digital distribution platforms such as Steam, App Store, or Google Play.
Conclusion
Creating a 3D Unity game requires a combination of creativity, technical skills, and dedication. By following this guide, you have learned the essential steps involved in making a 3D Unity game, from setting up Unity to publishing your creation. Remember to continuously learn, iterate, and have fun throughout the process. Good luck, and may your game bring joy to players around the world!