Prefabs in Unity are a powerful tool for creating reusable and modular game objects. However, there are times when you need to make changes to a specific instance. In such cases, unpacking becomes essential. In this article, we will walk you through the process of unpacking prefabs in Unity, allowing you to customize and modify individual instances with ease.
Understanding Prefabs
Prefabs in Unity are preconfigured assets that allow you to create and reuse game objects with consistent properties and behaviors. They serve as templates that can be instantiated multiple times in a scene, providing several benefits throughout the game development process. Here are some key advantages of its use:
- Reusability: Prefabs promote efficient workflow by enabling you to create an object once and reuse it in multiple instances throughout your project. This saves time and effort, as you don’t have to recreate similar objects from scratch;
- Consistency: You can ensure uniformity in design and functionality across your game. Any changes made to the original prefab automatically update all instances, maintaining consistency throughout your project;
- Efficiency in Updates: If you need to make changes to a prefab, those changes will propagate to all instances of that prefab. This allows for easy updates and modifications, reducing the need to manually adjust each individual object;
- Modularity: It enhances flexibility by allowing you to create complex object hierarchies. You can nest prefabs within others, enabling the creation of reusable components and systems that can be easily modified and combined;
- Collaboration: Prefabs facilitate collaboration among team members. Designers, artists, and developers can work on different aspects of the project simultaneously, with changes to prefabs being reflected in real-time, ensuring everyone is working with the latest version;
- Performance Optimization: By using prefabs, you can optimize performance by reducing the number of draw calls and improving memory management. Instances of the same prefab share resources, resulting in more efficient rendering and improved performance;
- Iteration and Prototyping: They are invaluable during the iteration and prototyping phase of game development. They allow you to quickly test different variations and configurations without the need for extensive coding or asset creation.
When to Unpack Prefabs
Unpacking prefabs in Unity is a process that involves breaking the prefab instance connection and converting it into a regular game object with no link to its original prefab. While it offers numerous benefits, there are certain situations where unpacking them becomes necessary. Here are some scenarios when you may consider unpacking prefabs:
Customization
If you need to make specific modifications to a prefab instance that are not intended to be propagated to other instances, unpacking allows you to customize that particular object without affecting the others. This can be useful when you want to create unique variations or fine-tune specific elements of a prefab.
Independent Changes
Unpacking prefabs is beneficial when you want to make changes to a specific instance that should not be synchronized with the original prefab or its other instances. By unpacking, you can freely modify the object without worrying about unintentionally altering other prefabs or instances.
Performance Optimization
In some cases, unpacking prefabs can improve performance. If you have a large number of instances that share the same prefab, Unity’s internal overhead for managing the prefab connections can impact performance. Unpacking the prefabs can reduce this overhead and potentially improve the runtime performance of your game.
Collaboration and Asset Sharing
Unpacking prefabs can simplify collaboration with other team members or when sharing assets with external parties. It ensures that the asset is shared as a standalone game object without any prefab connections, making it easier to integrate into different projects or workflows.
Debugging and Troubleshooting
When encountering issues or bugs specific to a prefab instance, unpacking can aid in the debugging process. By unpacking the prefab, you can isolate the problematic instance and analyze it separately, making it easier to identify and resolve any issues.
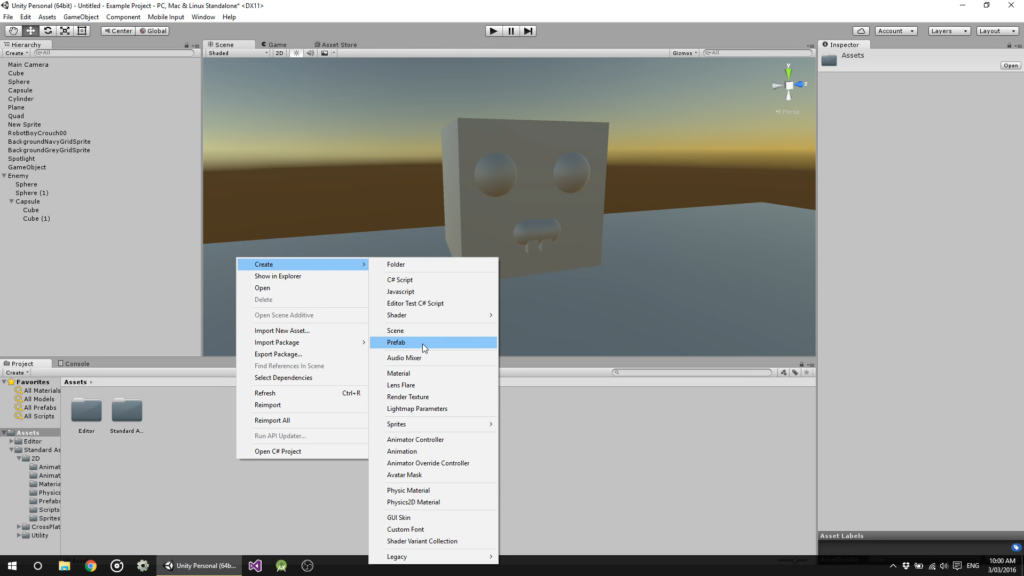
Unpacking Prefabs Step-by-Step
Identifying the prefab instance to unpack: Begin by navigating through the Unity Editor hierarchy to locate the specific prefab instance that you want to unpack. This can be done by expanding the relevant folders and objects within the hierarchy.
- Unpacking the prefab
Once you’ve identified the prefab instance, right-click on it to access the context menu. From the menu, select the “Unpack Prefab” option. This action will initiate the unpacking process, converting the prefab instance into a regular game object.
- Understanding the implications of unpacking
It’s important to comprehend the implications of unpacking. Unpacking creates a unique instance of the prefab, which means that any changes made to this instance will no longer affect other instances linked to the original prefab. This allows for independent modifications and customization.
- Modifying the unpacked prefab instance
With the prefab instance unpacked, you have the freedom to make changes and modifications. This can include adjusting the position, rotation, and scale of the object, as well as tweaking individual components attached to it. Explore the various modification options available to meet your specific needs.
- Managing unpacked prefab instances
As you work with unpacked prefab instances, it’s crucial to establish strategies for organization and tracking. Consider implementing naming conventions, grouping related instances together, or utilizing Unity’s organizational features such as folders and tags. This will help maintain clarity and prevent confusion as you continue to work on your project.
Best Practices and Considerations
When working within Unity, it’s important to follow best practices and consider certain factors to ensure a smooth and efficient development process. Here are some key practices and considerations to keep in mind:
| Practice | Description |
|---|---|
| Modular and Reusable Design | Design prefabs with a modular and reusable approach, enabling easy duplication and reuse in different parts of the project. |
| Organized Hierarchy | Maintain a well-organized hierarchy within prefab instances, grouping related objects and utilizing parent-child relationships for clarity and ease of navigation. |
| Reference Management | Mindfully set up and maintain references within prefabs, avoiding broken references that can lead to runtime errors or unexpected behavior. |
| Variants | Utilize prefab variants to create variations of a base prefab without altering the original, allowing modifications of specific properties or components while maintaining core functionality. |
| Nesting | Consider nesting prefabs to create complex and modular structures, with each nested prefab representing a self-contained unit, promoting organization, reusability, and easier component modifications. |
| Version Control | Include prefabs in version control systems like Git to track changes, collaborate effectively, and manage conflicting changes with ease. |
| Overrides | Understand and utilize prefab overrides to make modifications to specific instances of a prefab without affecting the rest, enabling customization while preserving the core functionality. |
Conclusion
Unpacking prefabs in Unity provides developers with the flexibility and control to tailor specific instances to their unique needs. By following the step-by-step guide in this article, you now have the knowledge and tools to unpack prefabs effectively. Embrace the power of customization and unlock the full potential of your Unity projects with unpacked prefabs.